

उबंटू (Ubuntu) Linux पर आधारित एक लोकप्रिय ओपन-सोर्स ऑपरेटिंग सिस्टम है जो इस्तेमाल करने में आसान इंटरफेस और कई तरह के सॉफ्टवेयर ऑप्शंस देता है। यह community (समुदाय) के कोलैबोरेशन और freedom (स्वतंत्रता) के साथ आसान एक्सेस और security (सुरक्षा) के सिद्धांतों को महत्व दे देता है।
Ubuntu को इनस्टॉल करें!
चरण 1: Ubuntu डाउनलोड करें
- अपने वेब ब्राउज़र का उपयोग करके आधिकारिक उबंटू Ubuntu वेबसाइट (https://ubuntu.com/) पर जाएं।
- “डाउनलोड” टैब पर क्लिक करें।
- वह उबंटू Ubuntu संस्करण चुनें जिसे आप install करना चाहते हैं (आमतौर पर स्थिरता के लिए LTS (Long Term Support) वर्ज़न रिकमंड किया जाता है)।
- अपने सिस्टम की स्पेसिफिकेशन के आधार पर उपयुक्त आर्किटेक्चर (32-बिट या 64-बिट) चुनें।
- उबंटू Ubuntu आईएसओ ISO फाइल डाउनलोड करने के लिए “डाउनलोड” बटन पर क्लिक करें।
चरण 2: बूट करने योग्य यूएसबी ड्राइव बनाएं
- अपने कंप्यूटर में कम से कम 4GB स्टोरेज क्षमता वाली एक USB फ्लैश ड्राइव डालें।
- बूट करने योग्य USB ड्राइव बनाने के लिए “Rufus” (विंडोज के लिए) या “Etcher” (macOS और Linux के लिए) जैसे टूल को डाउनलोड और इंस्टॉल करें।
- Rufus या Etcher खोलें और पहले डाउनलोड की गई उबंटू ISO फाइल चुनें।
- टारगेट डिवाइस के रूप में डाली गई USB ड्राइव को चुनें।
- बूट करने योग्य USB ड्राइव बनाने के लिए “स्टार्ट” पर क्लिक करें। यह प्रक्रिया USB ड्राइव पर सभी डेटा को मिटा देगी, इसलिए सुनिश्चित करें कि आपने किसी भी महत्वपूर्ण फाइल का बैकअप ले लिया है।
चरण 3: यूएसबी ड्राइव से बूट करें
- अपना कंप्यूटर पुनरारंभ restart करें।
- जैसे ही आपका कंप्यूटर रीस्टार्ट होता है, BIOS या UEFI सेटिंग्स दर्ज करें। आप आमतौर पर स्टार्टअप के दौरान किसी विशिष्ट की को दबाकर इसे एक्सेस कर सकते हैं (आम कुंजियों में F2, F10, F12, ESC, या DEL शामिल हैं – सही की आपके कंप्यूटर निर्माता पर निर्भर करती है)।
- BIOS या UEFI सेटिंग्स में, “बूट” या “बूट प्राथमिकता” मेनू पर नेविगेट करें।
- बूट क्रम बदलें ताकि आपका कंप्यूटर पहले USB ड्राइव से बूट हो जाए।
- परिवर्तन सहेजें और BIOS या UEFI सेटिंग्स से बाहर निकलें। आपका कंप्यूटर अब पुनरारंभ होगा और USB ड्राइव से बूट होगा।
चरण 4: उबंटू Ubuntu इंस्टॉल करें

एक बार यूएसबी ड्राइव से उबंटू बूट होने के बाद, आपको उबंटू इंस्टॉलर स्क्रीन दिखाई देगी।
आगे के steps में आपको अपनी भाषा चुनने, कीबोर्ड लेआउट चुनने, सॉफ़्टवेयर इंस्टॉलेशन विकल्प चुनने, और अपना सिस्टम सेटअप करने जैसी चीज़ें शामिल होंगी।
चरण 5: इंस्टॉलेशन के बाद का सेटअप (optional)
- रिबूट करने के बाद, इंस्टॉलेशन प्रक्रिया के दौरान आपके द्वारा बनाए गए उपयोगकर्ता नाम और पासवर्ड का उपयोग करके अपने उबंटू सिस्टम में लॉग इन करें।
- टर्मिनल खोलकर (Ctrl+Alt+T दबाएं) और निम्न कमांड चलाकर अपने सिस्टम को अपडेट करें:
sudo apt update
sudo apt upgrade
- अपने उबंटू Ubuntu डेस्कटॉप को customize करें, अतिरिक्त सॉफ़्टवेयर इंस्टॉल करें, और अपनी पसंद के अनुसार अपने सिस्टम को कॉन्फ़िगर करें।
बधाई हो! आपने अपने कंप्यूटर पर उबंटू को सफलतापूर्वक इंस्टॉल कर लिया है। अब आप Linux की दुनिया की सैर करने का आनंद ले सकते हैं।
English Version
Ubuntu is a popular open-source operating system based on Linux that offers a user-friendly interface and a wide range of software options. It emphasizes community collaboration and the principles of freedom, accessibility, and security.
Step by step guide to install Ubuntu
Step 1: Download Ubuntu
- Go to the official Ubuntu website (https://ubuntu.com/) using your web browser.
- Click on the “Download” tab.
- Choose the version of Ubuntu you want to install (usually the LTS – Long Term Support – version is recommended for stability).
- Select the appropriate architecture (32-bit or 64-bit) based on your system’s specifications.
- Click the “Download” button to start downloading the Ubuntu ISO file.
Ubuntu installation
Step 2: Create a Bootable USB Drive
- Insert a USB flash drive with at least 4GB of storage capacity into your computer.
- Download and install a tool like “Rufus” (for Windows) or “Etcher” (for macOS and Linux) to create a bootable USB drive.
- Open Rufus or Etcher and select the Ubuntu ISO file you downloaded earlier.
- Choose the USB drive you inserted as the target device.
- Click on “Start” to begin creating the bootable USB drive. This process will erase all data on the USB drive, so make sure you have backed up any important files.
Step 3: Boot from the USB Drive
- Restart your computer.
- As your computer restarts, enter the BIOS or UEFI settings. You can usually access this by pressing a specific key during startup (common keys include F2, F10, F12, ESC, or DEL – the exact key depends on your computer manufacturer).
- In the BIOS or UEFI settings, navigate to the “Boot” or “Boot Priority” menu.
- Change the boot order so that your computer boots from the USB drive first.
- Save the changes and exit the BIOS or UEFI settings. Your computer will now restart and boot from the USB drive.
Step 4: Install Ubuntu
- Once Ubuntu boots from the USB drive, you will see the Ubuntu installer screen.
- Choose your preferred language and click “Install Ubuntu.”
- Select your keyboard layout and click “Continue.”
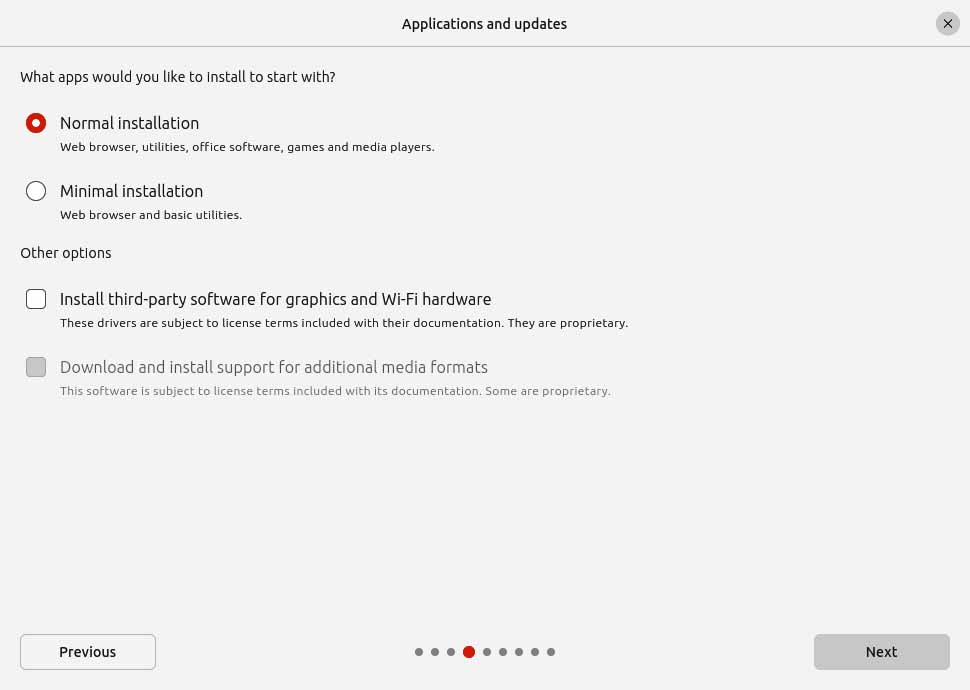
- Choose whether you want to install third-party software for graphics, Wi-Fi hardware, and media formats, then click “Continue.”
- Select the installation type. If you’re new to Ubuntu or want to install it alongside your existing operating system, choose “Install Ubuntu alongside [your other OS].” If you want to erase everything on your disk and install Ubuntu, choose “Erase disk and install Ubuntu” (this option will delete all data on the disk, so be sure to back up any important files).
- Follow the on-screen instructions to configure your time zone, user account, and other settings.
- Once you’ve configured everything, click “Install” to begin the installation process.
- Sit back and wait for the installation to complete. This may take some time depending on your computer’s speed and the installation options you selected.
- Once the installation is finished, you’ll be prompted to restart your computer. Remove the USB drive and restart your computer.
- Congratulations! You have successfully installed Ubuntu on your computer. You can now enjoy exploring the world of Linux.
Step 5: Post-Installation Setup (Optional)
- After rebooting, log in to your Ubuntu system using the username and password you created during the installation process.
- Update your system by opening the Terminal (press Ctrl+Alt+T) and running the following commands:
sql
-
sudo apt update

sudo apt upgrade
- Customize your Ubuntu desktop, install additional software, and configure your system according to your preferences.
That’s it! You’re all set up with Ubuntu on your computer. Enjoy using your new operating system!